Discover the power of Flux AI, the latest innovation in AI image generation that’s being hailed as the “Stable Diffusion killer.”
Flux AI is the future of AI-powered art, surpassing Stable Diffusion 3 in many ways. This guide will show you how to install and use Flux AI on ComfyUI, unlocking its full potential to enhance your creative workflow.

Whether you’re an experienced AI artist or just starting, Flux AI provides unparalleled capabilities to turn your text prompts into stunning visual masterpieces.
This comprehensive tutorial will guide you through the process of installing and utilizing Flux AI on ComfyUI, from downloading essential weights and models to generating stunning images from text prompts. Whether you’re an experienced AI artist or a newcomer, this guide will help you unlock the full potential of Flux AI.

To run Flux AI on your PC, it’s recommended to have 64GB of RAM and at least 24GB of VRAM, such as an RTX 3090 or RTX 4090. Without these specifications, the performance may be significantly slower.
Follow these steps to create high-quality images with Flux AI.
If you have already ComfyUI Installed Skip Step 1, However make sure Your ComfyUI is Updated!
Step 1: Installing ComfyUI
Ensure you have ComfyUI installed on your system. If you haven’t installed it yet, follow these steps:
- Visit the ComfyUI GitHub page.
- Follow the installation instructions provided in the repository’s README file.
- Once installed, open ComfyUI.
Step 2: Downloading the Necessary Files
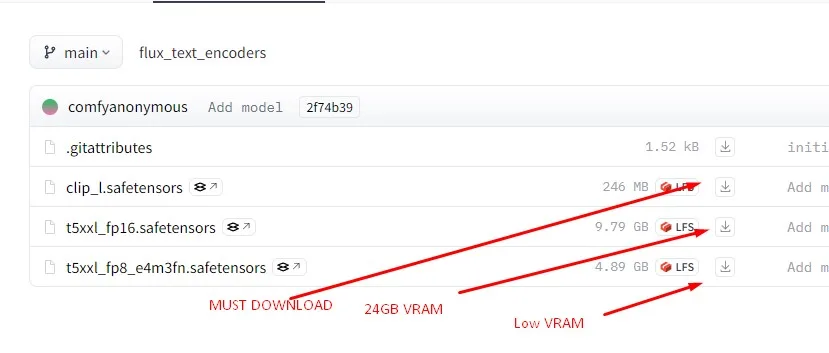
Before you begin, you need to download the required Flux AI weights and CLIP models. Here are the links to the necessary files:
- CLIP Model from here
- Download the clip_I.safetenseors file into ComfyUI>Models>Clip
- If you have a low VRAM GPU download t5xxl_fp8_e4m3fn.safetensors or if you have high VRAM GPU you can go for fp16 file this file will be placed in same clip folder ComfyUI>models>clip
- VAE Model: VAE Model by Black Forest Lab
- Download the file ae.sft and place in ComfyUI>Models>VAE folder
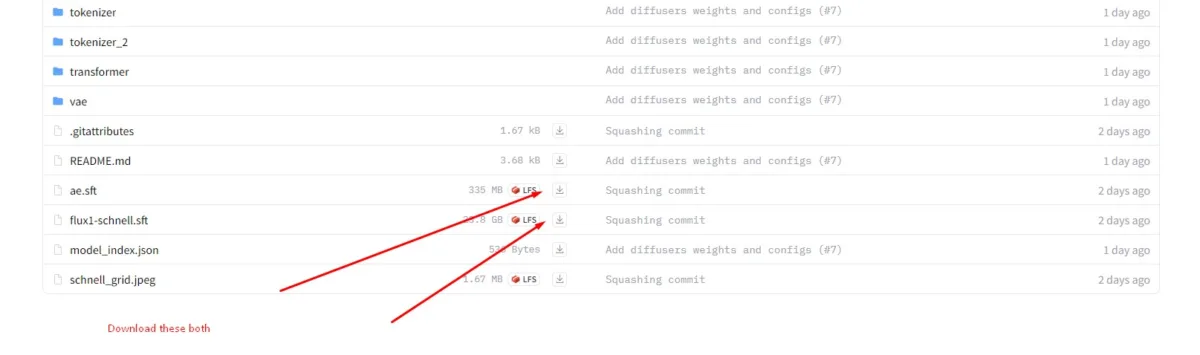
- UNet Model: UNet Model by Black Forest Lab
- Last file the largest one about 23gb flux1-schell.sft this will be downloaded in ComfyUI>models>unet folder
Step 3: Downloading a simple Workflow
To generate images using Flux AI, you need to create a workflow. You can either create one from scratch or use a pre-built workflow. For this tutorial, we’ll use a pre-built workflow:
- Download the Workflow:
- Visit the Reverent Workflow on OpenArt.
- Download the workflow file to your computer.
- Import the Workflow into ComfyUI:
- In ComfyUI, navigate to the Workflows tab.
- Click on the “Import Workflow” button and select the downloaded workflow file.
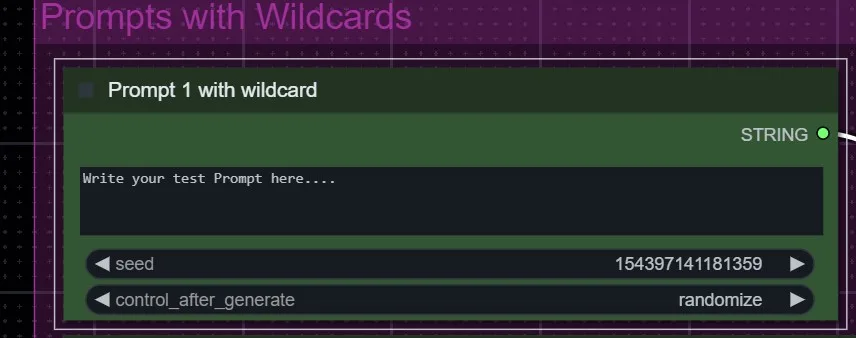
Step 5: Generating Images from Text Prompts
With everything set up, you can now generate images from text prompts:
- Open the Workflow:
- Go to the Workflows tab in ComfyUI.
- Select the imported Reverent workflow.
- Enter Your Text Prompt:
- In the workflow interface, find the text input field.
- Enter a detailed description of the image you want to generate.
- Run the Workflow:
- Click on the “Run” button to start the image generation process.
- Wait for the process to complete. The generated image will be displayed in the output section.
Here are some examples:


Why Flux AI?
Flux AI offers several advantages over previous AI image generation models, including:
- Higher Image Detail: Flux AI produces images with exceptional detail and clarity.
- Better Prompt Adherence: The model accurately interprets and adheres to text prompts.
- Artistic Style Range: Flux AI supports a wide range of artistic styles, making it versatile for various creative needs.
Stable Diffusion 3 (SD3) was disappointing and didn’t live up to the pre-launch hype. Finally, there’s something amazing that generates images at the level of Midjourney.
Enjoy exploring the limitless possibilities of AI-powered art.
NOTE: If you have any questions, queries please leave a comment below and we’ll try our best to answer as quickly as possible.
INCPak is Pakistan’s first news and information site to share insights about generative AI. Follow us on social media platforms. and Stay updated with the latest news by joining the INCPak WhatsApp Channel